Model Guidance Products Page
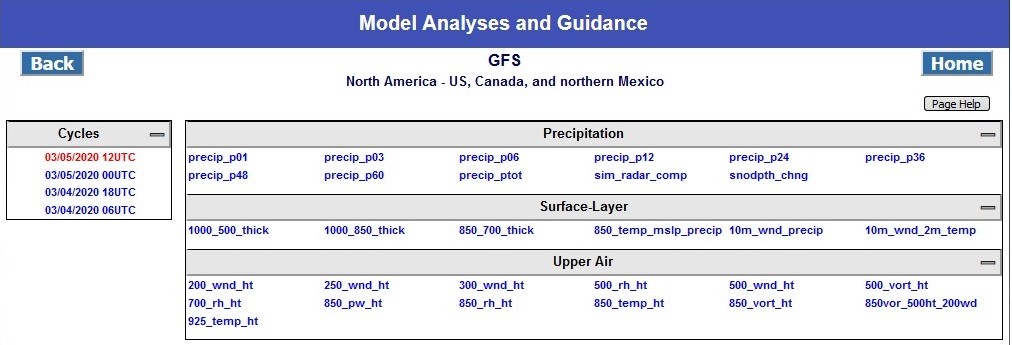
☰ MenuAfter choosing the Model and Area from the Model Guidance page, the Model Guidance Product Page is displayed. The figure below shows the Model Guidance Product Page for the model, GFS, and the area, NAMER.
The Model Guidance Product Page contains the following:
- A Back button that returns to the Model Guidance Page.
- A Home button that returns to the MAG Home Page
- A Page Help button that explains the Model Guidance Products Page.
- All of the user's choices are displayed in accordion boxes. Each accordion box has a title at the top, with the choices listed below. The accordion boxes can be closed by clicking on the title. Clicking the title again will open the box. A minus symbol (-) on the righthand side of the title indicates clicking on the title will close the box. A plus symbol (+) indicates clicking on the title will open it.
- Available model cycles are displayed in an accordion box on the left side. The cycles are displayed with the latest cycle as the default, at the top of the box, and highlighted in red. To view the products from a previous cycle, click on the desired 'mm/dd/yyyy hhUTC' link. That link will turn red, and the page will show all the products generated for that cycle.
- The product names available for the selected Model and Area. The available products are grouped into categories, each category in an accordion box. The figure below shows four different categories: Precipitation, Surface-Layer, Upper Air, and Four Panel Display.
The figure below shows the Model Guidance Product page with all accordion boxes open.
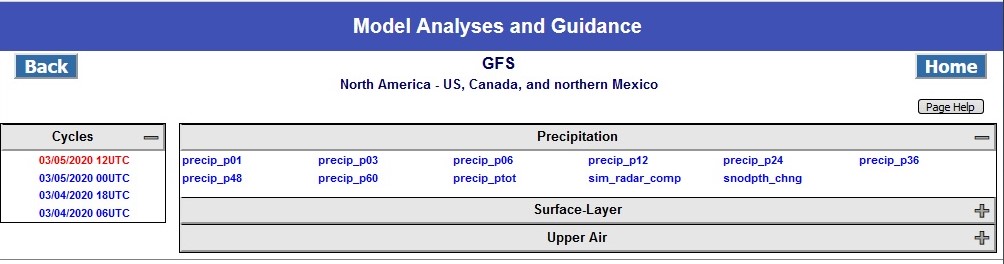
The following figure shows the Model Guidance Product page with 2 of the product accordion boxes closed. In this example, the user might only be interested in Precipitation products, so has closed the other 2 product accordions. They can be reopened by clicking on the title (with + symbol). The opened/closed accordion choices are stored as local browser session variables. This means the choices will be remembered as long as the browser is open. When the browser is closed, the variables are discarded. [Note: these choices are never sent to the MAG server, they are only stored on the local browser/computer.]
Click on one of the products to display the available forecast hours for that product. The next figure shows the Model Guidance Product page after precip_p03 has been selected.
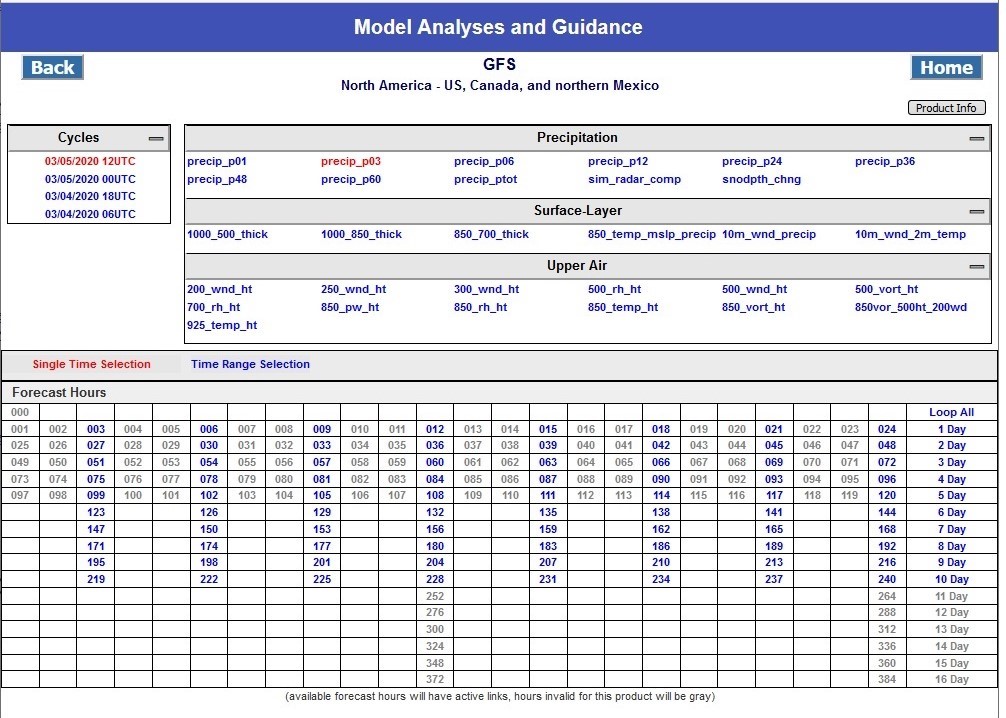
The Model Guidance Product page adds the following additional information, once a product has been selected:
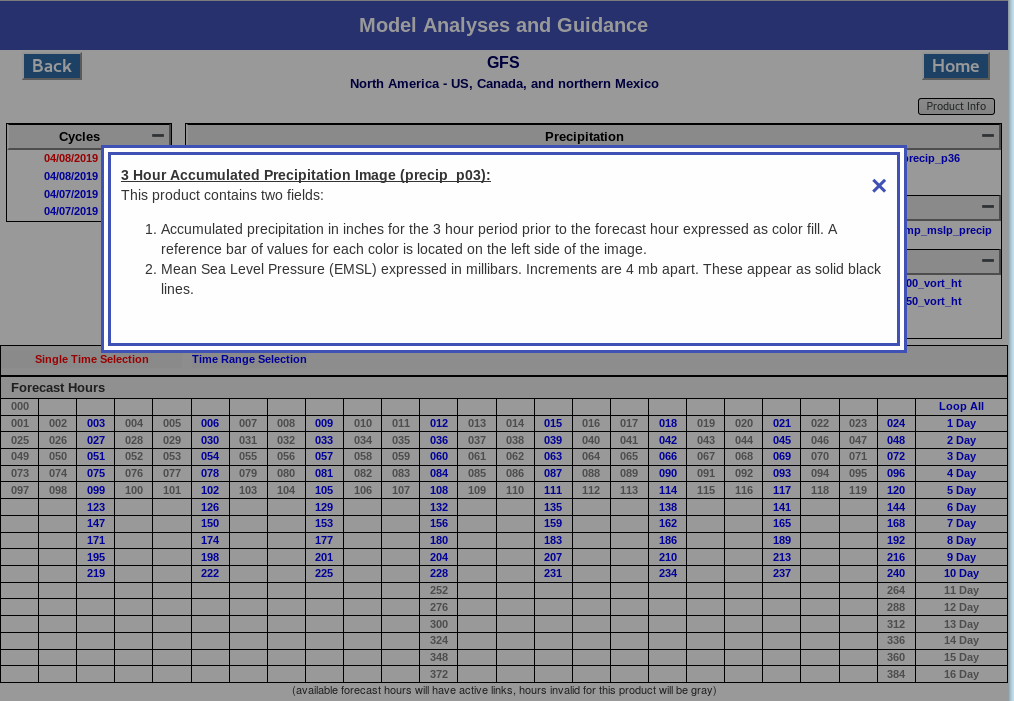
- A button labeled 'Product Info'. Click this button to display information on the product that was selected. The information is displayed in a modal popup box (see image below). To close the box, click anywhere inside the box.
- A row with two 'TIME SELECT' options. These options are used to specify how to view forecast hour images: Single Time selection (one image), or Time Range Selection (user-specified start and ending times of a loop). This feature is described in detail in the next section.
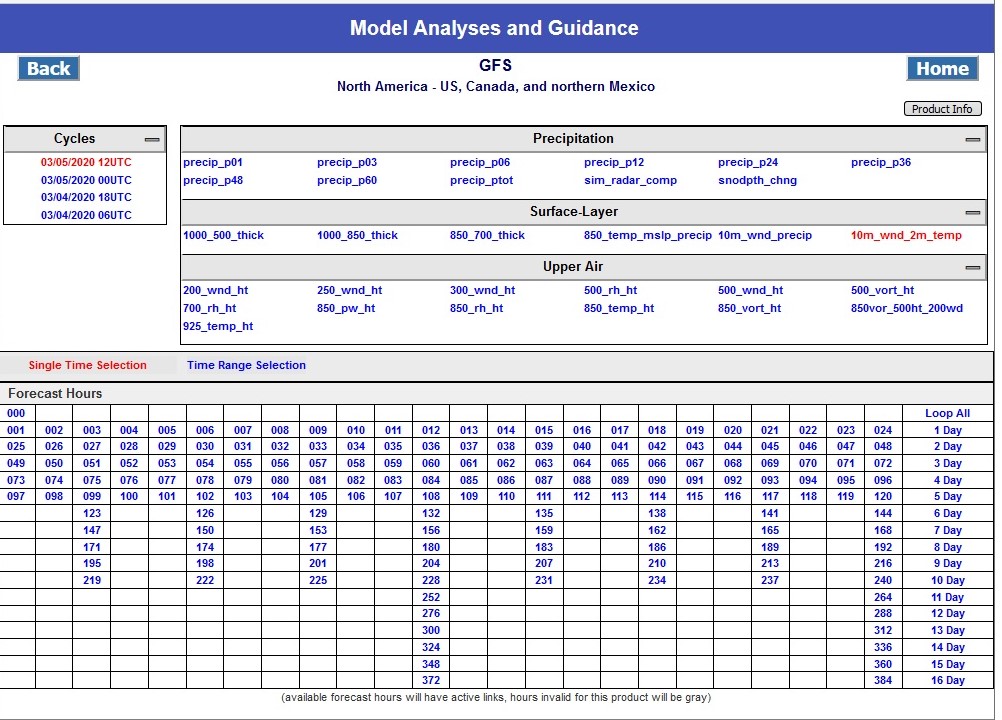
- A table of forecast hours available for the selected product.
- Pre-defined loop links, 'Loop All', '1 Day', '2 Day', etc.
Forecast hour and pre-defined looping links
The table of forecast hours, and the pre-defined loops are shown as clickable links, or static text that is black or gray:
- A blue, clickable link indicates the image is available. The figure above shows forecast hours 003, 006, ... 192 are available, as well as 'Loop All', '1 Day', '2 Day', through '8 Day'.
- Black text indicates a forecast hour or predefined loop is valid for the model and area, but the model has not completed to the point of making the image for the forecast hour. The image should be available soon. The figure shows forecast hours 195 - 240 are valid times for this product, but they are not yet available. Predefined loops '9 Day' and '10 Day' are also not yet available, since images for those day have not been completed.
- Gray text indicates a forecast hour or predefined loop that is not valid for this product. The figure shows forecast hours 000, 001, 002, 007, 008, ... are not valid for this product, as well as hours 252 - 384, and loops '11 Day', '12 Day', ... '16 Day.
Forecast hours table auto-refresh: If some expected images were not found, then the product page will continue to check for them once a minute. Once all expected images are found, then the product page will stop checking. Note that if a new cycle starts, the user will need to refresh the page manually to load the new cycle links.
Clicking on a pre-defined loop link will start the loop running. "Loop All" will loop all available images. "1 Day" will loop images from the first available forecast hour through one day. "2 Day" will loop from the first available forecast hour through the second day, etc.
Clicking on a forecast hour link will either display the image for that hour, or select it for user-selected looping, depending on the Time Select mode, which is described in the next section.
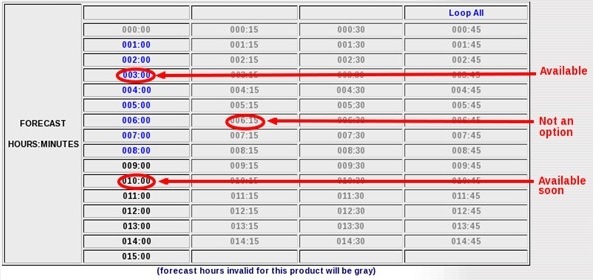
Some of the models produce forecast hours and minutes. For these models, forecasts are presented as forecast hour:forecast minute (hhh:mm). The next figure shows the forecast hours table for the HRRR model that produces 4 images per hour for some products. For the selected product in the figure, only one per hour is generated. The figure shows that forecast hour:minute 001:00 through 008:00 are ready, while 009:00 through 015:00 are not yet completed. All of the 15, 30, and 45 minute forecast minutes are not valid.
Time Select Modes
The two TIME SELECT modes are used to specify how to view forecast hour images:
- Single Time Selection: displays all available forecast hours as links. When a forecast hour link is clicked, the image for that link is displayed. This is the default mode.
- Time Range Selection: provides functionality for the user to select the looping time range, (the start and end forecast hour to use in the loop), and the time interval desired.
Single Time Selection Mode
The figure below shows the Model Guidance Product Page with Cycles, Products, Time Select choices, Forecast Hour links, and pre-defined loops links. 'Single Time Selection' is displayed in red, indicating that the current Time Select mode is Single Time Selection. While in this mode, clicking on a forecast hour link displays the static image for that forecast hour.
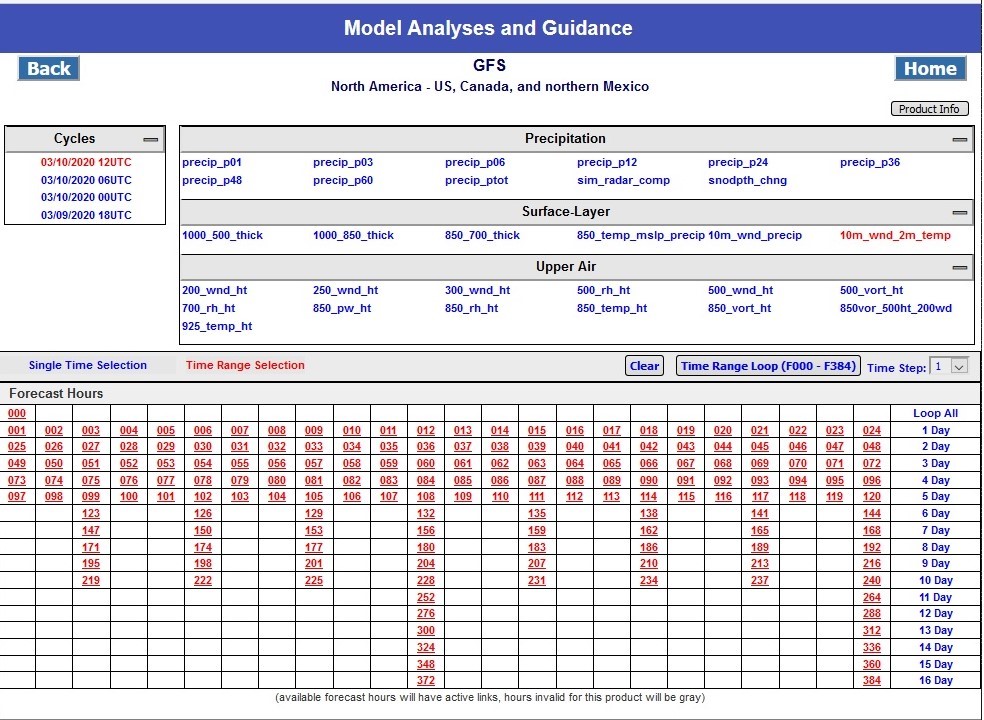
Time Range Selection Mode
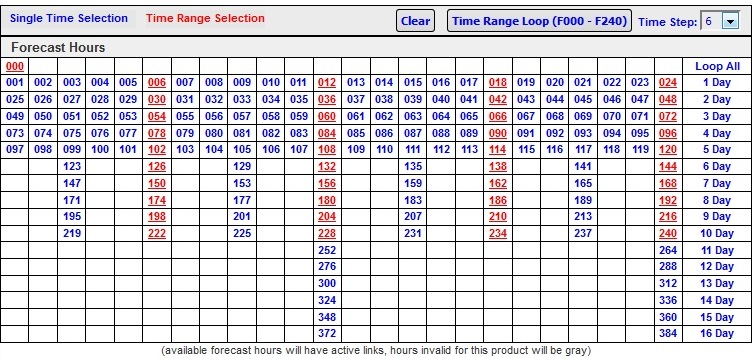
To set the Time Select mode to Time Range Selection, click the text 'Time Range Selection'. The text will turn red, and additional controls will appear:
- button to clear (turn off) selection of forecast hours for looping.
- button to start custom looping. The starting and ending forecast hours are listed on the button, in this case F000 to F384.
- Time Step selection, 1=use every hourly image, 3=use every 3-hourly image, etc.
When 'Time Range Selection' mode is first entered, all available forecast hour links will be selected (red and underlined), as shown in the figure below.
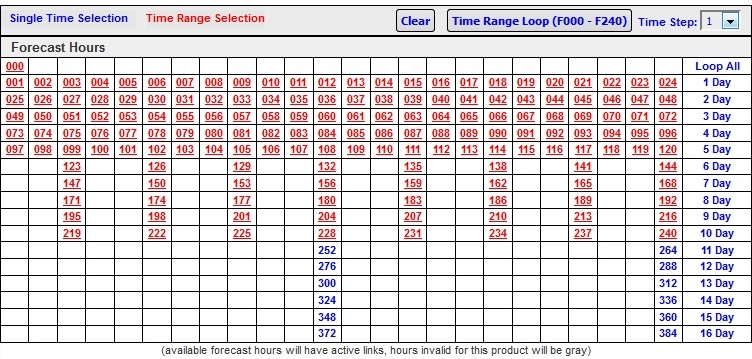
The starting and ending forecast hour settings may be changed by simply clicking
another forecast hour. If the user would like to loop from F000 to F240, then
clicking on the link 240 will change the ending forecast hour to F240.
The loop button changes to:
as shown in the figure below.
Clicking on the current starting forecast hour will deselect that link, and advance the starting hour to the next hour. Clicking on the current ending forecast hour will deselect that link, and change the ending hour to the previous hour. Clicking somewhere in the middle of the selected forecast hours will set that link as the new starting hour or the new ending hour, depending on whether that link is closer to the current starting or ending hour.
To avoid confusion, simply click the 'Clear' button, then click your desired starting hour and then click your desired ending hour.
The Time Step selection specifies the interval to use during the loop. A Time Step of 1 (one), specifies every available forecast hour be included in the custom loop. Changing the Time Step to 3 directs the looping script to use a 3-hour interval in the loop (000, 003, 006, 012, etc.).
The figure below shows what happens to the previous example when the Time Step is set to 6. Images included in the loop will be for hours 000, 006, 012, ... 240.
The default Time Step will be the smallest interval possible for the product. For an houly product, the default Time Step will be 1. For a 3-houly product, the default Time Step will be 3. For a sub-hourly product, the default Time Step will be :15 (15 minutes).
While in Time Range Selection mode, the user can change to another product, and the software will keep the same skip number and loop range selections, if possible, i.e., if the new product has the same forecast hours available.
Note: the pre-defined loops ('Loop All', '1 Day', etc) work the same in either Time Select mode. The starting forecast hour for them is always the first available, then ending hours are pre-determined, and all available hours in between are shown in the loop.